Free Sample

Apply Now

CN

×

keywords:

xxxx1 xxx2 xxx3 xx4 copy
Shenzhen Meiyad Optoelectronics Co., Ltd. Shenzhen Meiyad Optoelectronics Co., Ltd.

Recommend LED Cube Display For Special Advertising

Recommend LED Cube Display For Special Advertising

15
08
2019

In this article, we will know a special led display. Let me introduce the led cube display.


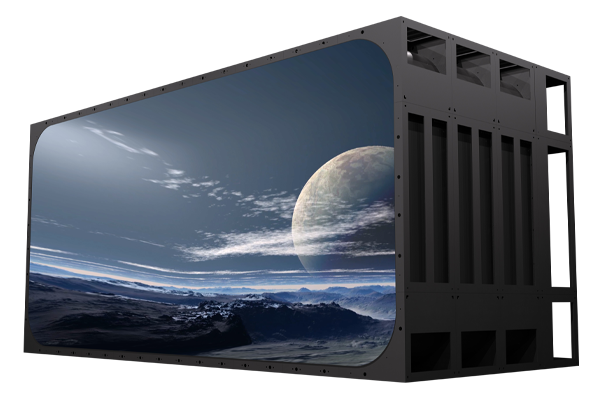
Literally, led cube display is a cube-shaped display which has 4 or 5 or more sides.


Meiyad Cube LED Screen


If it is a 4-sided led cube display, it can show 4 pcs different video respectively, and also can show 1 video as a whole. Special design of led cube display structure gives the audience significant feeling, make 100% attraction.


P4 Cube LED Display in Suzhou Hotel, 8 pillars, 67sqm


P4 Cube LED Display in Suzhou Hotel, 8 pillars, 67sqm.


P2.976 Cube LED Screen in Singapore Shopping Mall


P2.976 Cube LED Screen in Singapore Shopping Mall, Width 1.25m * Height 2.25m * 4 sides =11.25 sqm


P3 LED Cube Display in New Delhi Shopping Center, Width 4.572m * Height 0.99m * 4 sides * 2 pcs = 36.2 sqm


Cube size and pixel pitch are customizable. Cube LED display is one the free form displays that designed for HD special effects. Like custom led balls, it is applicable to advertising media, concert, TV show, shopping mall, entertainment, exhibition, airport, hotel, station hall and other public places or other special events in need of creative decoration.


You May Also Like

SP Series Rental LED Screen Cabinet Operation Guide

10|10|2026

SP Series Rental LED Screen Cabinet Operation Guide: Assembly, Curving, and Maintenance

Rental LED screens are widely used for concerts, exhibitions, conferences, stage performances, and other live events. Efficient cabinet assembly, flexible screen configuration, and convenient maintenance are essential for ensuring smooth installation and reliable operation.The SP Series rental LED screen cabinets support different assembly configurations, including flexible cabinets, standard cabinets, angled cabinets, and 500 × 1000 mm cabinets. With their cabinet locking mechanisms and adjustable curvature locks, users can assemble LED screens to meet different event and stage design requirements.This guide provides step-by-step instructions for bending flexible cabinets, connecting different cabinet types, adjusting curvature locks, creating inward and outward curves, and performing LED module and power supply maintenance.How to Bend a Flexible Rental LED Screen CabinetFlexible LED cabinets allow users to create curved rental LED screens for stage backdrops, exhibitions, and other event applications.Follow these steps to bend a flexible cabinet:1. Remove the cabinet locking clips before bending.2. Hold the cabinet handles firmly with both hands.3. Press the spring tabs at the upper ends of the handles.4. Carefully bend the cabinet to form the desired curved shape.5. Observe the graduated scale next to the spring tabs while bending.6. Use the scale readings to control the cabinet's curvature.Pay close attention to the scale during adjustment to achieve the desired bending angle.How to Connect Flexible LED CabinetsProper alignment is important when connecting flexible cabinets to build a rental LED wall. The cabinets can be connected horizontally and vertically.Horizontal Cabinet ConnectionBring the side edges of the cabinets close together.Align the cabinet edges and ensure that the display surfaces are level and flush.Insert the side locking pins into the corresponding locking holes.Press the handles to secure the locking mechanism.Lock the lower locking mechanism as well.Check the cabinet alignment and adjust the position as needed.Insert and secure the locking pins completely.Repeat these steps when connecting additional cabinets. Check the surface alignment throughout the assembly process to maintain a consistent display plane.Vertical Cabinet ConnectionWhen connecting flexible cabinets vertically, follow these steps:1. Position the upper cabinet above the lower cabinet.2. Align the locating holes on the bottom of the upper cabinet with the locating pins on the top of the lower cabinet.3. Lower the cabinet so that the locating pins fit into the corresponding holes.4. Insert all three locking pins.5. Secure all three pins and check that the cabinets are firmly connected.Ensure that the locating pins are correctly aligned and all three locking pins are fully secured before continuing the installation.How to Connect Standard Rental LED CabinetsStandard LED cabinets are suitable for assembling flat rental LED screens for concerts, exhibitions, conferences, and other event applications.Follow these steps to connect standard cabinets:1. Bring the side edges of the cabinets close together.2. Align the cabinets and ensure that the display surfaces remain level.3. Insert the locking pins into the corresponding locking holes.4. Secure the locking pins.5. Check that the cabinets are properly aligned and firmly connected.Repeat the process for the remaining cabinets to complete the rental LED display.How to Adjust the Curvature LockThe curvature lock is used to adjust and secure the cabinet angle when creating curved LED screen configurations.Follow these steps to adjust the curvature lock:1. Open the operating lever on the curvature lock.2. Check the graduated scale and adjust the curvature to the desired setting.3. Press the lever downward to lock the curvature setting.4. Check the two curvature locks on the side of the cabinet.5. Adjust both locks to matching angles according to the scale.Ensure that the two curvature locks have consistent settings before proceeding with cabinet assembly.How to Create Inward and Outward Curved LED ScreensBy adjusting the curvature locks to different scale settings, users can create inward-bending or outward-bending configurations during cabinet assembly.Inward-Bending Cabinet ConnectionTo create an inward-bending configuration:1. Adjust the curvature locks to the required negative scale setting.2. Bring the cabinet sides together.3. Align the cabinets and connect them using the designated locking mechanism.4. Secure the locking pins.5. Check the resulting screen curvature.The negative scale setting allows the cabinets to be connected in an inward-bending configuration, as demonstrated in the operation video.Outward-Bending Cabinet ConnectionTo create an outward-bending configuration:1. Adjust the curvature locks to the required positive scale setting.2. Bring the cabinet sides together.3. Align the cabinets and connect them using the designated locking mechanism.4. Secure the locking pins.5. Check the resulting screen curvature.The positive scale setting allows the cabinets to be connected in an outward-bending configuration, as demonstrated in the operation video.Always refer to the scale markings on the actual cabinet when adjusting the curvature.How to Connect Angled Rental LED CabinetsAngled LED cabinets are designed for screen configurations that require angled joints or right-angle connections.Standard Connection of Angled Cabinets1. Bring the side edges of the cabinets close together.2. Align the cabinets and keep the display surfaces level.3. Insert the locking pins into the corresponding locking holes.4. Secure the locking pins.5. Check that the cabinets are properly aligned and connected.Creating a Right-Angle Connection with Angled CabinetsWhen using angled cabinets to create a right-angle connection, adjust the locking components as follows:1. Remove the curvature lock.2. Remove the spacer block from the angled locking pin.3. Reinstall the spacer block in the inward-facing position.4. Bring the angled cabinet sides together vertically.5. Ensure that the angled edges fit closely together.6. Insert the locking pins and secure them.7. Lock the lower locking pins in the same way.Check that all locking points are secured and the angled edges remain closely aligned.How to Connect 500 × 1000 mm Rental LED CabinetsThe SP Series also includes 500 × 1000 mm LED cabinets for building rental LED screens in different sizes and configurations.Follow these steps to connect the cabinets:1. Adjust the curvature lock to the required angle.2. Bring the side edges of the cabinets close together.3. Align the cabinets and ensure that the display surfaces remain level.4. Insert the locking pins into the corresponding locking holes.5. Secure both locking pins on the side of the cabinet.Once both side locking pins are fully secured, the cabinets can be connected as required to assemble the rental LED display.Rear Maintenance: Removing and Installing an LED ModuleRear maintenance allows technicians to remove and reinstall LED modules from the back of the rental LED screen cabinet.Removing an LED Module from the Rear1. Rotate open the locking plates along the upper and lower edges of the module.2. Hold the module handle and push the module forward to release it from its mounting position.3. Tilt the module and guide it out through the designated opening.4. Disconnect the safety cord.5. Remove the module.Installing an LED Module from the Rear1. Attach the safety cord first.2. Guide the module through the designated opening.3. Hold the handle and align the module with its installation position.4. Pull the module backward into the cabinet.5. Secure all the module locking levers.6. Check that the module is correctly positioned and firmly locked.The rear maintenance procedure is complete once the module is securely installed.Front Maintenance: Removing and Installing an LED ModuleFront maintenance allows technicians to access an LED module from the front of the rental LED panel.Removing an LED Module from the Front1. Rotate open the locking levers along the upper and lower edges of the module.2. Use a compatible suction tool to remove the module from the front.3. Disconnect the safety cord.4. Remove the module carefully.Installing an LED Module from the Front1. Attach the safety cord before installation.2. Align the module with its designated mounting position.3. Position the module directly against the cabinet.4. Ensure that the module is correctly seated.The front maintenance procedure is complete once the module is installed in the correct position.Power Supply Maintenance: Removing and Installing the Power Supply BoxProper power supply maintenance helps technicians service the rental LED display cabinet when necessary.Removing the Power Supply Box1. Disconnect the power and follow the appropriate electrical safety procedures.2. Open the locking clips on both sides of the power supply box.3. Remove the power supply box from the cabinet.Installing the Power Supply Box1. Ensure that the power is disconnected.2. Align the power supply box with the corresponding interface.3. Press the box firmly into place until it is fully seated.4. Secure the locking clips on both sides.5. Check that the power supply box is correctly installed and both locking clips are secured.Complete the required inspection before reconnecting power.Practical Tips for Rental LED Screen Assembly and MaintenanceTo help ensure efficient installation and reliable operation, keep the following points in mind when working with SP Series rental LED screens.Check cabinet alignment. Ensure that adjacent cabinets are properly aligned and that their display surfaces remain level.Secure all locking mechanisms. Check the locking pins, lower locks, and other designated connection points during assembly.Monitor the curvature scale. When bending flexible cabinets or adjusting curvature locks, use the scale readings to control the setting.Check both curvature locks. Ensure that the two locks on the side of the cabinet are adjusted to matching angles.Handle LED modules carefully. Follow the specified removal and installation procedures when performing front or rear maintenance.Observe electrical safety procedures. Disconnect the power before removing or installing the power supply box.Refer to the operation video. Use the accompanying video as a visual reference for cabinet assembly, curvature adjustment, and maintenance procedures.ConclusionThe SP Series rental LED screen cabinets provide flexible options for assembling LED displays for concerts, exhibitions, conferences, and other live events. Understanding the correct cabinet connection methods, curvature lock adjustments, and module maintenance procedures helps technicians work more efficiently during installation and servicing.Whether you are building a flat rental LED screen, an inward-bending or outward-bending display, or a right-angle LED wall, following the correct operating procedures is essential for achieving proper cabinet alignment and reliable connections.For more information about SP Series rental LED displays and professional event LED screen solutions, contact our team to discuss your project requirements.

P4.81 Rental LED Display Project for an International Ice Arena

23|09|2026

P4.81 Rental LED Display Project for an International Ice Arena

Project OverviewWe recently completed an LED display project for an international ice arena, providing a large-format visual solution for ice sports, live performances, and entertainment events.The project features our P4.81 rental LED display, with a total screen area of 121.48 m². To meet the installation requirements of the venue, the project combines 500 × 500 mm and 500 × 1000 mm LED cabinets, creating a flexible and seamless large-screen display system.With its large viewing area and dynamic visual effects, the LED display has become an important part of the arena's overall event environment.Project SpecificationsItemSpecificationProject TypeIce Arena LED Display ProjectProductP4.81 Rental LED DisplayPixel Pitch4.81 mmCabinet Sizes500 × 500 mm / 500 × 1000 mmTotal Display Area121.48 m²ApplicationIce Arena / Ice Events / Live PerformancesP4.81 Rental LED Display for a Large Ice ArenaLarge indoor ice venues require LED display solutions that can deliver a strong visual impact while adapting to the structure and layout of the venue.For this project, the P4.81 rental LED display provides a large-format canvas for videos, graphics, event visuals, promotional content, and other dynamic media.The 4.81 mm pixel pitch is well suited to large event screens viewed from a medium-to-long distance, making it a practical solution for large venues where the audience is distributed across the stands and arena floor.The display works together with the arena's lighting system to create a dynamic visual environment during events and performances.121.48 m² of Immersive Visual ExperienceWith a total display area of 121.48 m², the LED system provides plenty of space for high-impact visual content.During ice events and live performances, the screen can be used to display:Event introductions and opening visualsLive video and replaysPromotional videosSponsor and advertising contentEvent graphics and animationsPerformance backgroundsAudience entertainment contentThe large LED display helps connect the on-ice performance with the audience, while colorful graphics and video content can be synchronized with the venue's lighting and entertainment system.Flexible Combination of 500 × 500 mm and 500 × 1000 mm CabinetsA key feature of this project is the combination of 500 × 500 mm and 500 × 1000 mm rental LED cabinets.Using different cabinet sizes provides greater flexibility when designing and installing large LED screens. It allows the display structure to better adapt to the dimensions and installation requirements of the venue.The rental-style cabinet design is also suitable for event applications where efficient assembly, disassembly, transportation, and reconfiguration are important considerations.This flexibility makes the solution suitable for a variety of large-scale indoor events beyond a single type of ice activity.Designed for Ice Events and Live PerformancesBased on the completed installation, the venue is used for more than a single sporting application. The ice surface can serve as a stage for ice performances, skating activities, entertainment programs, and other large-scale events.The LED display plays an important role in these events by providing a large visual background and a platform for dynamic digital content.Combined with professional stage lighting, the P4.81 LED display helps create a more immersive atmosphere across the entire arena.A Versatile Rental LED Display SolutionThe project demonstrates the versatility of rental LED displays in large indoor venues.In addition to ice arenas, similar P4.81 rental LED solutions can be applied to:Indoor sports venuesIce skating and performance venuesConcerts and live showsCultural and entertainment eventsOpening and closing ceremoniesExhibitions and conferencesLarge-scale stage productionsThe modular cabinet design makes it possible to create different screen configurations according to the requirements of each project.Bringing Dynamic Visuals to the Ice ArenaThe completed 121.48 m² P4.81 rental LED display provides the venue with a powerful visual communication platform.From colorful event graphics and promotional content to large-scale performance visuals, the LED screen helps transform the ice arena into a more dynamic and engaging event space.This project also demonstrates our ability to provide customized LED display solutions for international customers, from product selection and cabinet configuration to the final large-format display installation.ConclusionThis international ice arena project combines P4.81 rental LED technology, flexible cabinet sizes, and a large 121.48 m² display area to create a versatile visual solution for ice events and live performances.The combination of 500 × 500 mm and 500 × 1000 mm cabinets provides installation flexibility, while the large LED display delivers an impactful visual experience for audiences throughout the venue.We continue to provide customized rental LED display solutions for sports venues, entertainment spaces, live events, and other large-scale applications worldwide.Looking for a rental LED display for your next event or venue project? Contact us to discuss your requirements.

Send Your Inquiry Today

Factory Direct LED Screen - Fast Quote, Best Price!

Please enter your company name
Please accept the data protection information

I have read and understood the  data protection   information.